
Welcome to the UKS Spring BlogHop! You may have come to me from PaperCollecter Anon
If you lose your way, or have dropped in on me directly and want to follow the hop, you can see the full list with all the links here
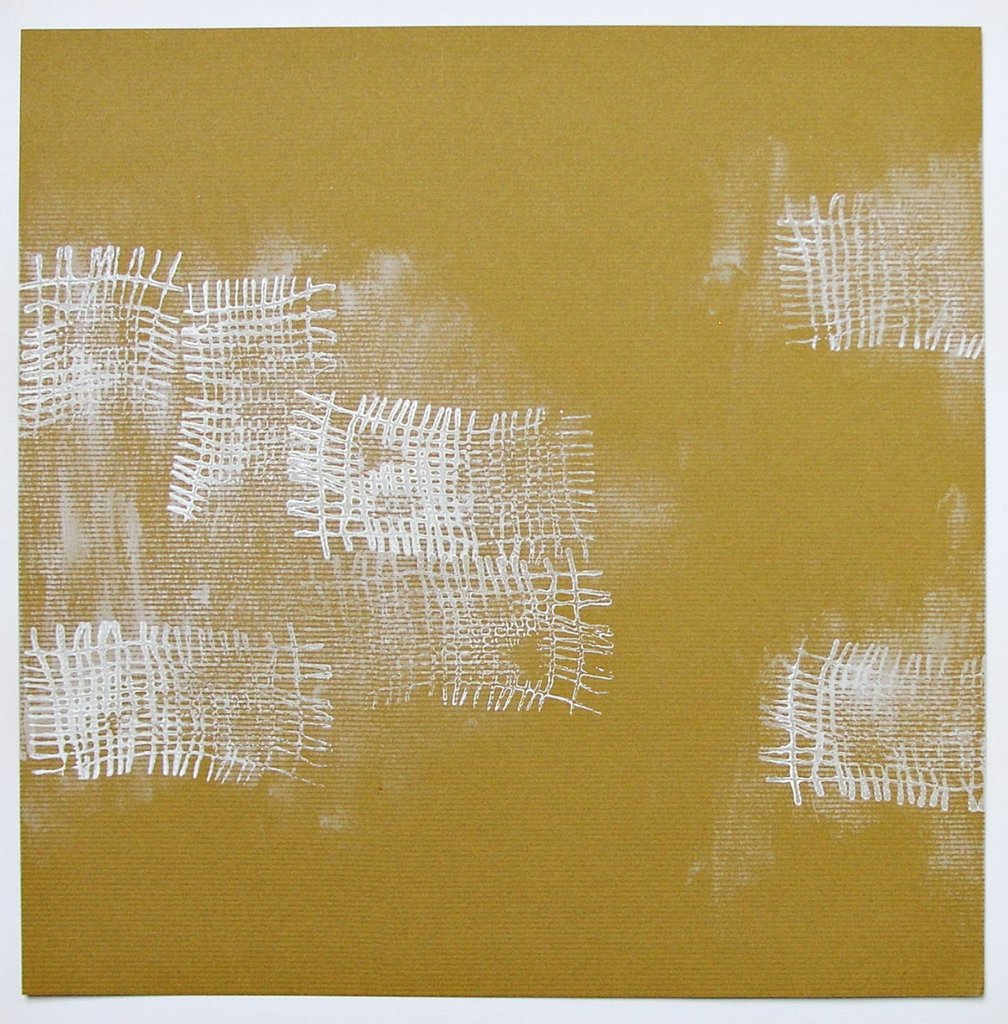
Ever wondered how to get from this...

... to this?
I'm here today to share my process for adding layers and dimension to a scrapbook layout. I'm sure there are hundreds, if not thousands of other ways, but this is how I do it and if you manage to gain something useful here today it would make me very happy!
So, I started my first layer by rubbing over the cardstock with white acrylic paint where I expected the embellishments and photo to go. I tend to have a sketch in mind when I start a project although I'm pretty flexible and sometimes the end result is far removed from the original idea! to create more depth I overstamped the painted area with a background stamp with more acrylic. I try not to worry too much about how it looks at this stage because a lot of it will be covered up anyway.
Now to start adding some paper layers... my layout has a border top and bottom and along one side, I cut my strips ready and do a little inking and 'lifting' of the paper with my fingers to stop it looking too flat on the page...

I use the same process for adding layers behind my photo, I don't think about the size of the paper too much, just adding scraps and offcuts of coordinating papers in a way that pleases me and if I like it? I stick it down! (or I would be there for hours shuffling paper *rolls eyes*) HOWEVER... I only stick down in places that will still enable me to lift the edges of my papers and tuck more things in should I need to. Can you see the difference using your fingers to gently curl the edges of the paper makes to the overall look of the photomat?

Now for the fun bit! Notice that I haven't actually stuck down my mat yet, I still like to have a bit of 'shuffle-space'! I've added more depth by using the negative space from a scallop circle die cut, with a little PP peeking through behind and a fussy cut flower raised with popdots over the top. I've echoed the banner diecuts on the photomat with more banners in the top corner.

Nearly finished, but the layout needs more contrast so a bit of black stamping and ink spattering is required (that's another reason why I don't stick the mat down!, a few extra embellishments (yup, I stuck a bird on it!)and a bit more woodgrain tucked in here and there to help tie everything together.

So, just the title (and a few more twiddly bits...) to go! If you've managed to stick with me for this long then thank you for your patience. I do hope you found this useful and it has given you some ideas how to create layers in your own projects. The PPs I have used for this layout are all from the latest Quirky Kit from Crafty Templates.
The next blog on the hop is The House of Bears thank you again for visiting and I hope you come back soon!

Please comment on this post by midnight 18th April if you would like a chance to win this...

I will pick a prize at random and post the results in my next post.
Nikki xxx
I really do need to start using paint. What a lovely page and a great way to use up oddments
ReplyDeleteA lovely LO. I love seeing other people construct pages especially how they change things along the way and add extra bits. I must crack open that new tube of what acrylic and get messy.
ReplyDeleteThanks for sharing you process
Wizbit (Liz)
Ps one of my favourite YouTube channels is by a lady called mercy tiara who puts up videos of her making her LOs (she speeds them up a bit and adds dialogue... Watched one the other day when she left her table during filming and her cat decided to lie down right on top of her LO!)
Thanks for the tip, will look out for her, would love to try a video tut but haven,t got the confidence yet!
DeleteWhat a super tutorial, thank you. I love that fabric-like stamp you;ve used.
ReplyDeleteSue x
Super ideas, thanks for sharing :)
ReplyDeleteI love your tutorial and the layout is superb, thanks for showing us your technique :) x
ReplyDeleteThis comment has been removed by the author.
ReplyDeleteLove the depth and all the effects
ReplyDeleteBeanpie 11 aka debbie
Absolutely love this, Im off for a scrappy weekend this coming weekend so will be giving this a go.
ReplyDeleteWhat a fab prize too
Can't wait to try this- gorgeous layout. I've found some lovely blogs today.
ReplyDeleteWould love to be in the draw for your prize.
Kim
Great tutorial and will give this a go - probably with suzy as I'm at the same scrappy weekend.
ReplyDeleteHave followed your blog and would love the chance to win
UKs lelly
Love the layers and depth. fab. tigerlady
ReplyDeleteI love that fabric effect stamp! Really cool. Fab tutorial, thank you for sharing.
ReplyDeleteI'm always looking for a way to add layers thanks for some really cool ideas...thanks for the chance of a prize to
ReplyDeletescrappybluecat uks
I'm a digi scrapper so tend to have several layers on my LOs .. but this has lots!! and, if you don't mind, I'd like to try it digi and see how it comes out!
ReplyDeleteOfcourse! Would love to see it if you do! x
DeleteGreat tutorial with lots of pictures, thanks for sharing. Great prize too:)
ReplyDeleteStunning layout and I love dimension and playing with paints and inks etc, think I may have to scrap lift if that's ok?
ReplyDeletefrom Boland :)
Please do, and please show me if you do! x
DeleteLovely LO - great idea with the acrylic paint - so effective! Thanks for sharing.
ReplyDeletechrisrydal x
Lovely ideas Thanks for sharing.
ReplyDeleteMeg baby UKS
I love the burlap style stamping.
ReplyDeletesimply stunning!!! Leigh11 xx
ReplyDeleteLovely layers :-)
ReplyDelete*here be dragons*
Love your LO. Great ideas. Thanks for sharing. UKS sue1952
ReplyDeleteLove these layers - something I am really trying to get a handle on so thanks for sharing your way of doing it.
ReplyDeletePaulineD UKS xxx
I have the Quirky kit, so I can see how you've used the papers. A great page, thank you. UKS - Sharon1973
ReplyDeleteLovely page, very tactile. Thank you (Maria in France on UKS)
ReplyDeleteSimply fabulous. Tank you for sharing this. KJJC uks name
ReplyDeleteThanks for posting and sharing and offering your own giveaway. :)
ReplyDeleteUKS name, AllycatD
Such a gorgeous page and I love how all the base layer really adds to the depth of it all. Beautiful x UKS Julesaroony
ReplyDeleteLove this LO Nik. Thank you for sharing with us. (UKS TinkerHamilton)
ReplyDeleteGorgeous LO! I'm always looking for inspiration to do with layers and how to make the layered look good. Thanks for sharing. Sian aka Violaceous :)
ReplyDeleteNice page, love the idea of white acrylic and then stamping on top looks good.
ReplyDeleteLove all the layering, ink and stamping, thanks for sharing
ReplyDeleteChris55 - UKS
ooh I love following through the creative process with you it is great to see it all come together and I will be back to see more of your fab pages thank you
ReplyDeleteI really love your layout, so pretty and the background is awesome! x
ReplyDeleteUKS - Clairewill
Gorgeous background stamp, I've seen them before but never thought of using it like that.
ReplyDeleteK (aka Sylphraven)
Love all the layers and the stamping - beautiful page - thank you for the how to :)
ReplyDeleteFAb, love all the layers. UKS - Scrappyyo
ReplyDeletewonderful page love the layers. Thanks
ReplyDeleteSoojay
Love all the layers on your LO, something we aspire to do but never quite achieve. Now with your tutorial we will try again,
ReplyDeleteFab to see how you put a page together - the end result is always stunning! TFS
ReplyDeleteJimjams x
A gorgeous post and so interesting to read. (And I am sorry but I just have to add what utterly gorgeous children you have in your banner x)
ReplyDeleteWhat a super LO - love all the layers and texture.
ReplyDeleteToni xx
(misteejay)
Love it niks :) thanks for sharing xx
ReplyDeletepurplybunny (uks)
Thanks for sharing this wonderful LO and love your techniques. Mary x
ReplyDeletescarymary555
Love the way you have layered up your papers and the finished LO is gorgeous! UKS..Bubbleblitt
ReplyDeletewhat a lovely layout - i'm inspired to get messy!-alibi
ReplyDeleteYou've no idea how glad I am to come across your post as my quirky kit arrived on Friday and I've been itching to use it! This lo looks great. Would love to be entered in your draw - Audrey xxx uks poetcrafty xxx
ReplyDeletelove the layout, love the photo, love love love the worked background.
ReplyDeletecantstopstampin
Loving his LO Nik
ReplyDeleteAka elainevking on UKS
What great ideas! Thanks for sharing. UKS Tagsie
ReplyDeleteBeautiful page, love the layers and messy stuff too! - Cassia
ReplyDeleteI love these paint effects. Thank you for the tutorial. Love, stillcrafting from UKS xx
ReplyDeleteBeautiful...and thanks for the clear instructions, feeling very inspired now! Hugs Sarah (butterbee on UKS)
ReplyDeleteThank you for you inspirational layout
ReplyDeleteBeautiful LO, I need to use more paint and ink in my LOs, JoPink
ReplyDeleteLove this layout it's fab. Love all the papers will have to look into quirky kits. Thanks for sharing :) (uks Jacqui200284)
ReplyDeletePretty a really lovely layout thanks for sharing
ReplyDeleteFran (Hedgie)
This is lovely and If it's ok with you I would like to lift this LO. I love the use of paint and inks and scraps of paper. Thanks for sharing and giving us all a chance to win the goodies :-)
ReplyDeleteNIKIG (UKS)
I would love it if you did, and please show me! x
DeleteGreat layers, fab layout.
ReplyDeleteLoving the step by step pics of all the stages, nice work.
ReplyDeleteThanks for sharing this - I love it :)
ReplyDeleteStacey SCrapred on UKS
Great to see you build this up, thanks for sharing
ReplyDeleteFifi-T
ooo very pretty will def be giving this a go!
ReplyDeleteuks - darm
Very cute page- love the bunting!
ReplyDeleteLaura Godfrey
love all the layers and the build up... got to try more of this kind of thing. I need to get more messy! It is all about the paper with my layouts and I think i am being inspired to become more artistic! dont include me in the draw and good luck to the winner! jenx uks wear crafts
ReplyDeleteOooh, I always need help with layering (not my strength) so this has lots of ideas for me. I particularly like the 'discrete' stamping behind the areas you're going to fill - and wouldn't that work well with the background stamps in your giveaway? (Please?!?)
ReplyDelete(Eileen C)
I love your lighthearted approach - I take everything so seriously and wibble and wobble for hours! Great tips and step by steps and nice of you to do a giveaway ...
ReplyDeleteAli x (Alibri)
Gorgeous LO Nikki - love the layers.
ReplyDeleteUKS Name Fizzydrink
Great tutorial and a very pretty LO :) Kitty Crafts UKS
ReplyDeleteThanks for the tutorial. very clear photos
ReplyDeleteUKS Meggie
Thanks for the tutorial, really must try to use paint on more los, do like it when I have a go but tend to be a bit impatient and want it dry instantly!
ReplyDeleteUKS - mumof4girls
If you have a heat gun it's great for drying things off quickly x
DeleteThanks for sharing the process - it's amazing what can be done from simple beginnings!
ReplyDeleteThanks for sharing Nik, I love the layout and looking everyone's processes. Love the blog candy too. UKS Jolene
ReplyDeleteLove it - thanks for great photos and info. Gill x UKS name is Seaside Crafter.
ReplyDeleteWow! fab tutorial. Great LO and lovely to see how it all came together :)
ReplyDeleteUKS PinkSparklyScrapper xx
Brilliant tutorial, love how the acrylic paint just softens the background in the end (thought it looked quite drastic to begin with, now I'm thinking I might give it a try)
ReplyDeleteFantastic tutorial Nikki thank-you :) Loved the finished LO. Hugs x
ReplyDeleteGreat tutorial I love to learn new techniques will give this a try
ReplyDeleteThank you